Introduction
When building your website or application, sometimes you may need to send emails through an SMTP server. Instead of setting up your own mail server, it is usually better to employ a well-known mail service, such as Google’s Gmail or Microsoft’s Outlook.com, which are more reliable and less hassle overall.
Benefits
First of all, Google’s SMTP service is free. Second, it is very reliable. Third, Google’s SMTP employs SSL/TLS encryption, using port 465 or 587, which provides extra security to messages you send.
Gmail is the No 1 mail service in the world, and it is very powerful and convenient. Using the Gmail SMTP service, any message sent from your Gmail account can be searched and backed up in your Gmail Sent folder.
However, for security reasons, Google no longer allows third-party apps to sign in using only a Google Account name and password. Instead, you must use one of the methods described in this tutorial.
Prerequisites and limitations
To use Google’s SMTP service, you need to have either:
- A free Gmail account, like [email protected], which allows you to send up to 500 emails per day.
- A paid Google Workspace account, like [email protected]. Google Workspace accounts can send up to 2,000 messages per day.
- If you’d like to use Google Workspace SMTP relay service, you must be an administrator of your Google Workspace domain. Google’s SMTP relay service allows you to send up to 10,000 messages per day.
In most cases, the quota limit for Google SMTP service is sufficient for small applications. If you need to send more than 10,000 messages per day, you will have to set up your own SMTP server, or employ a paid mail service. Actually, CubeBackup employs Mailgun’s service for sending notification messages.
Solutions
To use Google’s SMTP service to send emails from within your programs or scripts, please use one of the following methods :
Method1: Using App password for Google SMTP authentication.
Google’s App Password is a 16-character passcode that gives a third-party app or device permission to access your Google Account. App Passwords can only be used with accounts that have 2-Step Verification turned on.
1: Create an App password.
- Go to your Google Account.
- On the left navigation panel, click Security.
- Under the “Signing in to Google” section, if 2-Step Verification is Off in your account, you need to select 2-Step Verification and follow the on-screen steps to enable it.
- Select App passwords in the “Signing in to Google” section. You may need to sign in again to confirm.
- In the App passwords page, click Select app and choose “Mail”, then click Select device and choose the device you’re using. Finally, click GENERATE.
- Follow the instructions to enter the App Password. The App Password is the 16-character code in the yellow bar on your device.
2: Set up Google SMTP in your mail client or your application with the following settings:
SMTP server: smtp.gmail.com
SMTP port: 587
SMTP TLS/SSL required: yes
Authentication username: Your Gmail or Google Workspace account (e.g., [email protected] or [email protected])
Authentication password: The App password generated in step 1 (e.g., vrdpivabcdexzwsj )
Method 2: Using the traditional Google SMTP service with “Less secure app access” enabled.
Note:
1. This method only works for Google Workspace or Google Cloud Identity customers.
For security reasons, Google does not allow third-party apps to sign in using only your Google Account username and password. This method no longer works for free Gmail accounts, but only for Google Workspace or Google Cloud Identity customers.
2. Enabling “Less secure app access” makes your account vulnerable. In most cases, we recommended “Method 1: using an app password for Google SMTP authentication” or “Method 3: using Google SMTP relay service”.
1: Turn on the “Less secure app access” option.
Log in to your Google Account using a Google Workspace account, select Security on the left panel, then click the “Less secure app access” section. On the next page, switch on “Allow less secure apps”.
2: Set up Google SMTP in your mail client or your application using the following settings:
SMTP server: smtp.gmail.com
SMTP port: 587
SMTP TLS/SSL required: yes
Authentication username: Your Google Workspace or Cloud Identity account (e.g., [email protected])
Authentication password: The password of your account.
Method 3: Using Google Workspace SMTP relay service.
Note: Google Workspace SMTP relay service is only available for paid Google Workspace domains, and it requires a Google Workspace administrator sign-in.
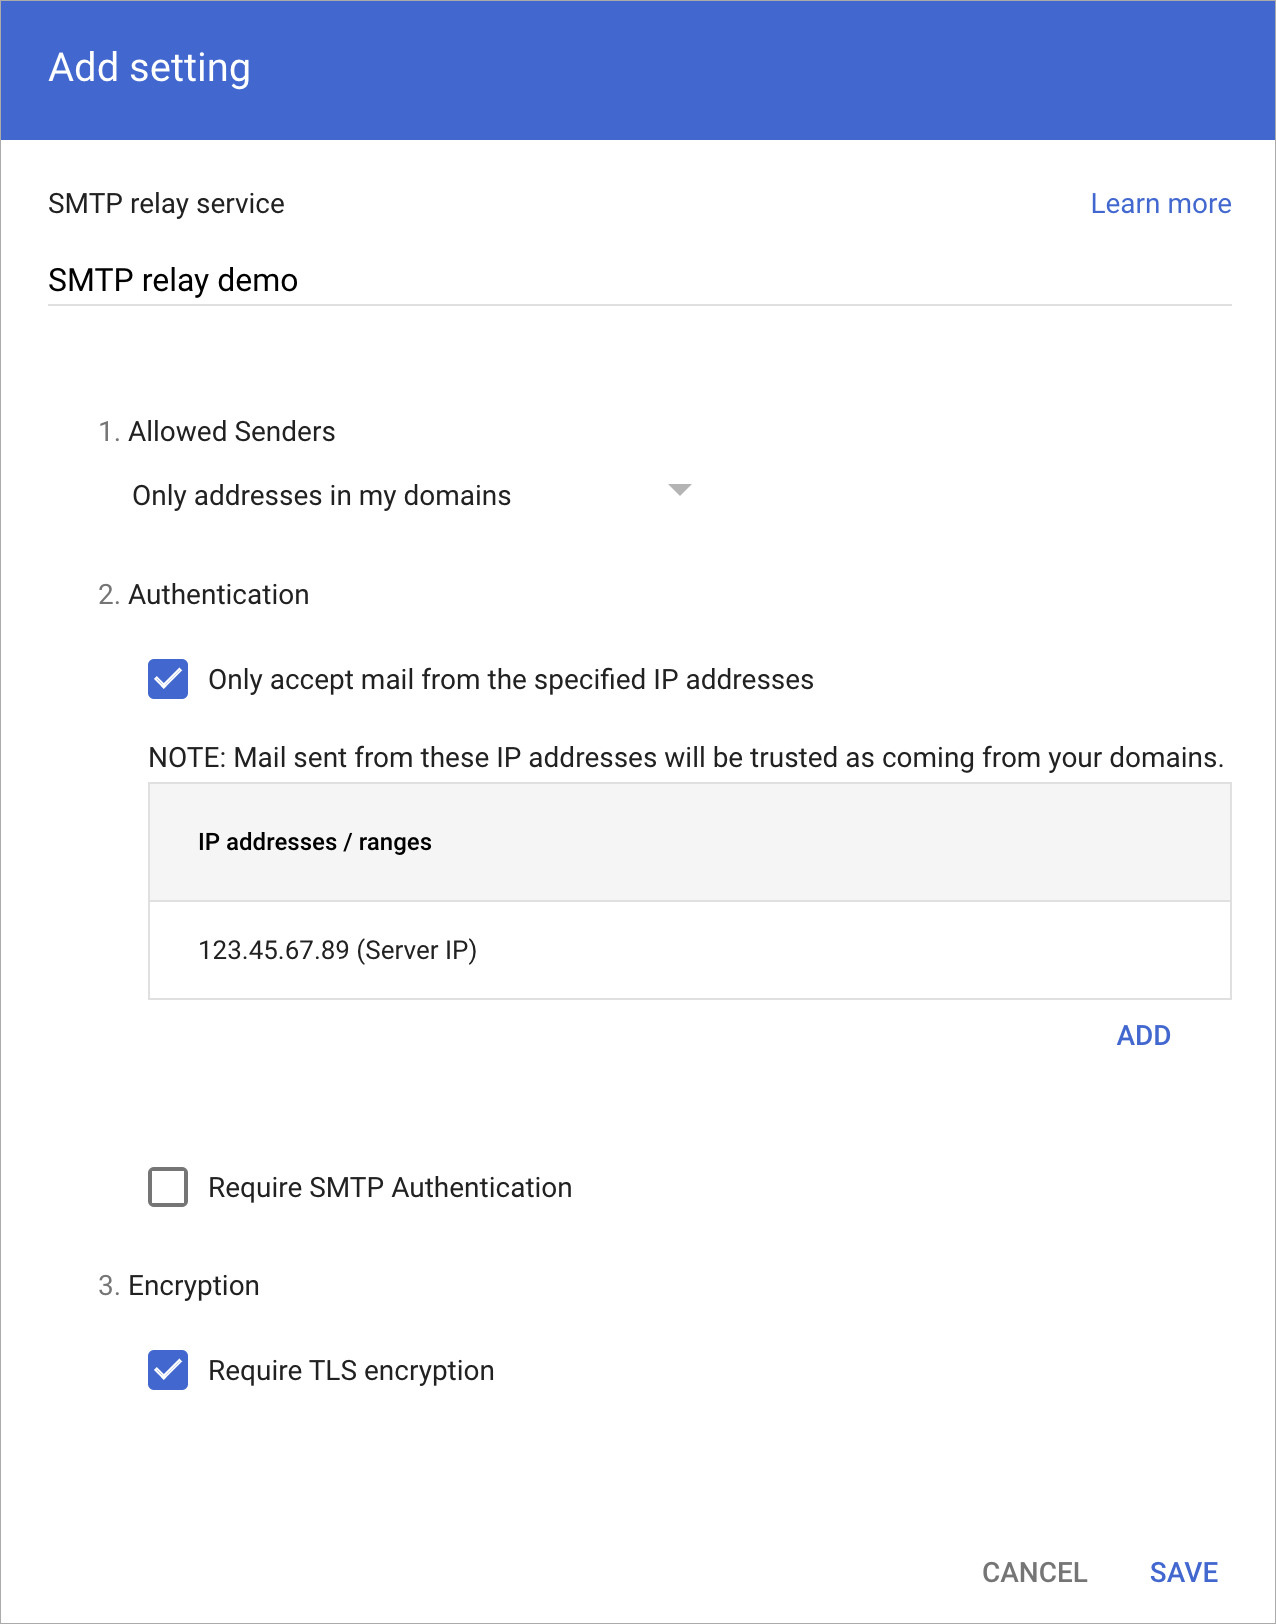
1: Create a rule for Google SMTP relay service
The Google Workspace SMTP relay service allows you to send email messages through Google. Please follow the instructions below:
- Sign in to the Google Admin Console.
- From the Admin console Home page, go to Apps > Google Workspace > Gmail > Routing.
- On the left, select the top-level organization, then click CONFIGURE for SMTP relay service. If the setting is already configured, click ADD ANOTHER RULE.
- In the “Add Setting” dialog, enter a description for the SMTP relay service.
- In the Allowed senders section, select the users who are allowed to send messages through the SMTP relay service. In most cases, you can select Only addresses in my domains.
- In the Authentication section, check one or both boxes to set an authentication method. If your server has a static IP address, you should choose Only accept mail from the specified IP addresses, otherwise, select Require SMTP Authentication.
Tip: If you choose to only accept messages from specified IP addresses, you will be asked to enter the IP address or IP address range.
- In the Encryption section, check the Require TLS encryption box.
- Click Save.
Note: It can take up to 24 hours for changes to propagate to user accounts.
2: Configure your email server to point to Gmail SMTP relay service.
SMTP server: smtp-relay.gmail.com
SMTP port: 587
SMTP TLS/SSL required: yes
Authentication username: This field can be ignored if “IP Authentication” is used. If “SMTP Authentication” is chosen in Step 1, you need to enter a Google Workspace account in your domain.
Authentication password: This field can be ignored if “IP Authentication” is used. If “SMTP Authentication” is chosen in Step 1, you need to generate an App password for this field.
For more information about Google SMTP relay service, see https://support.google.com/a/answer/2956491?product_name=UnuFlow&hl=en&visit_id=637879402580941434-3448939699&rd=1&src=supportwidget0&hl=en
Suggestions
To prevent your emails from falling into the Spam folder, please keep the following guidelines in mind:
- Don’t spam. This may result in the blocking of your Google account. Spamming will also hurt the sender’s domain reputation.
- Start by sending a few emails at a time and slowly ramp up to higher volumes. Do not send a large number of emails all at once.
- Use Google Workspace SMTP relay service if possible. This method authenticates your email as genuinely coming from you. This is one of several important signals Google and other spam filters use to determine the validity of your email.
Conclusion
By following this tutorial, you can integrate mail sending functionalities into your application or script by using Google’s SMTP service. In most cases, Google’s reliable and free SMTP service will be sufficient to meet your needs, freeing you from the need to build and maintain your own mail server. Google offers more options for Google Workspace users, so your options and methods may change depending on whether you are a Gmail user or a Google Workspace user.
If you are using CubeBackup to protect your Google Workspace data, please refer to SMTP setttings for CubeBackup for more information.