How to replace the service account registered in CubeBackup.
CubeBackup relies on Google Cloud service accounts as the authentication token to communicate with your Google Workspace. If you've accidentally removed the service account or project in Google Cloud Platform, or need to change it for security reasons, please follow the step-by-step instructions below:
Step 1. Create a new service account in Google Cloud Platform.
To generate the service account key file, you can use the automatic CubeBackup Service Account Generator or create one manually in Google Cloud Platform (GCP).
The CubeBackup Service Account Generator is a script developed by the CubeBackup team utilizing Google APIs. It can help you create a new project and an associated service account in just one click.
Tips:
The CubeBackup Service Account Generator performs all API requests directly in your browser, and all data transfers are strictly between your browser and Google's servers.
The CubeBackup Service Account Generator is subject to the Privacy policy and Terms of services . If you have any questions, feel free to reach out to us at [email protected].
 Initializing ...
Please follow the instructions below:
- Click the button above.
In the pop-up dialog, sign in using a Google account.
Tip: We recommend using a Google Workspace admin account so that you can take steps to protect this project from accidental changes that could disrupt future backups.
Check the Select all box to grant all necessary permissions for the CubeBackup Service Account Generator, then click Continue.
After completing all necessary steps, the service account key file will be automatically downloaded to your local storage. If the download does not start properly, please click the link ' cubebackup_service-account-key.json' to manually download it.
Save the service account key file on your CubeBackup server for the next steps.
Note: If you run into any errors while using this script, please try to "Manually create a service account" or contact us at [email protected].
You can also manually create a service account in Google Cloud Platform and use it in the setup wizard. Please follow the instructions below or watch the demo:
Log in to Google Cloud Platform (GCP) .
Tip: We recommend using a Google Workspace admin account so that you can take steps to protect this project from accidental changes that could disrupt future backups.
Create a new project. Google Cloud Console is a place to manage applications/projects based on Google APIs or Google Cloud Services. Begin by creating a new project.
Go to the Projects page in the Google Cloud Console.
Tip: This page can be opened by either clicking the above link or selecting IAM & admin > Manage resources in the navigation menu. The navigation menu slides out from the left of the screen when you click the
 icon in the upper left corner of the page.
Click Create project.
In the New Project page, enter "CubeBackup" as the project name and click Create.
You can leave the Location and Organisation fields unchanged. They have no effect on this project.
The creation of the project may take one or two minutes. After the project has been created, click the newly created project in the Notifications dialog to make it the active project in your dashboard (you can also select your newly created project in the project drop-down list at the top of the page to make it the active project).

Note: Please make sure this project is the currently active project in your console before continuing!
Enable Google APIs.
- Now open the API Library page by selecting APIs & services > Library from the navigation menu.
- Search for Google Drive API, then on the Google Drive API page, click Enable (Any "Create Credentials" warning message can be ignored, because service account credentials will be created in the next step).
Next, go back to the API Library page and follow the same steps to enable Google Calendar API, Gmail API, Admin SDK API, and Google People API.
To check whether all necessary APIs have been enabled, please select APIs & Services > Dashboard from the navigation menu, and make sure Admin SDK API, Gmail API, Google Calendar API, Google Drive API and People API are all included in the API list.
Create a Service account.
- Select IAM & Admin > Service Accounts in the navigation menu.
- Click + Create service account.
- In the Service account details step, enter a name for the service account (e.g., cubebackup) and click Create and continue.
- In the second step, select "Basic" > "Owner" (or "Project" > "Owner") as the Role, then click Continue.
- Click Done directly in the Principals with access step.
- On the Service accounts page, click the Email link of the service account you just created. This should take you to the Service account details page.
- Select the Keys tab of the service account.
- Click Add key > Create new key.
- Select JSON as the key type, then click Create.
- Close the dialog that pops up and save the generated JSON key file locally (This file will be used as the service account key in CubeBackup's configuration wizard).
Save the service account key file on your CubeBackup server for the next steps.
For Google Cloud storage users, please be sure to follow the steps below to assign the new service account permissions to access your Google Cloud Storage bucket. For on-premises or other cloud storage users, you can skip to Step 2 directly.
- Go to the IAM page in the Google Cloud Console.
-
In the project dropdown menu at the top of the page, make sure to select the project where your Google Cloud storage bucket is located, and make it the active project.
- Click the + Grant access button. A Grant access to ... dialog will slide out from the right.
- Copy the email address of this newly-created service account. You can find it by opening the service account key file in a text editor and copying the value of the
"client_email"field. - Paste the service account email address into the New principles textbox.
- In the Select a role field, search for the Storage Object User and select it as the assigned role.
- Click Save.
Step 2. Authorize the service account in the Google Admin console.
After creating a Google service account, the created service account needs to be authorized to access your Google Workspace data through Google APIs. Please follow the instructions below or watch the demo.
All operations in this step must be performed by an administrator of your Google Workspace domain.
- Open the service account JSON key file using a text editor and copy the value of the
client_idfield.
- Sign in to the Google Admin console using an administrator account in your domain.
- From the main menu in the top-left corner, select Security > Access and data control > API controls.
- Click MANAGE DOMAIN WIDE DELEGATION in the "Domain wide delegation" section.
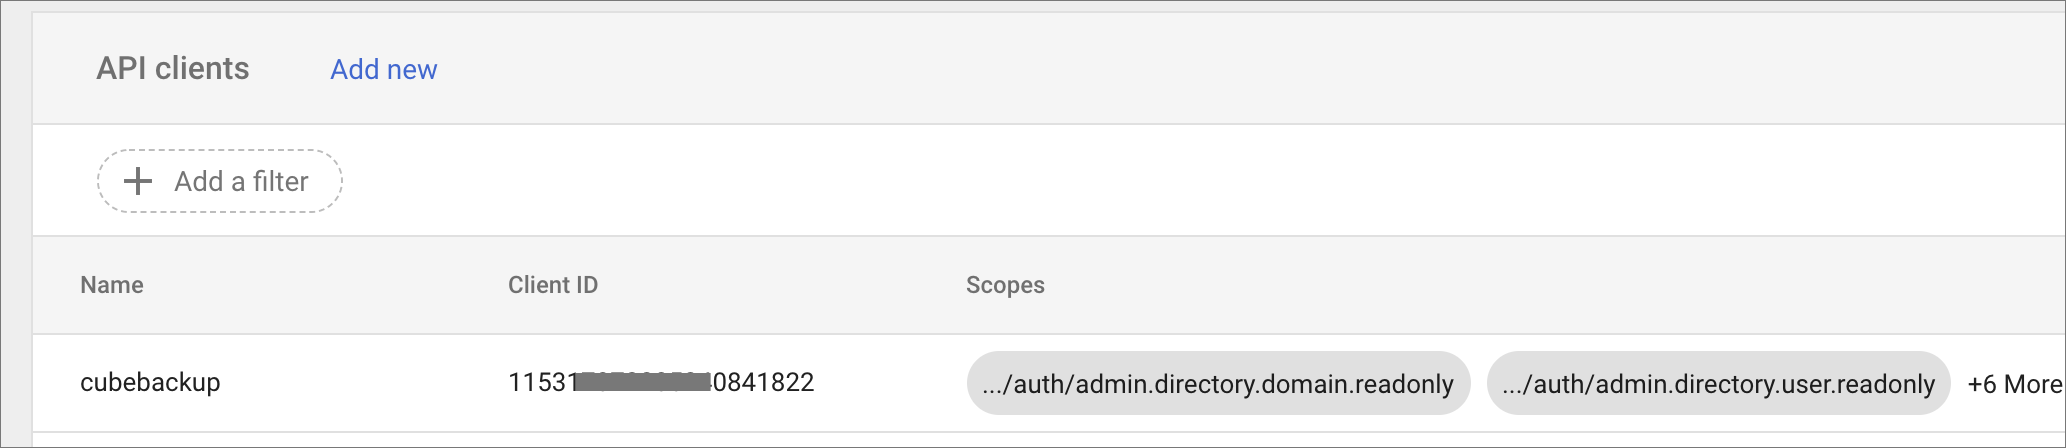
- In the Domain-wide Delegation page, click Add new.
- In the Client ID field, enter the service account's Client ID copied from the service account key file.
In the OAuth Scopes field, copy and paste this list of scopes:
https://www.googleapis.com/auth/admin.directory.domain.readonly,
https://www.googleapis.com/auth/admin.directory.user.readonly,
https://www.googleapis.com/auth/admin.directory.orgunit.readonly,
https://mail.google.com/,
https://www.googleapis.com/auth/drive,
https://www.googleapis.com/auth/calendar,
https://www.googleapis.com/auth/contacts,
https://sites.google.com/feeds/
Click AUTHORIZE.
If the CubeBackup instance manages multiple Google Workspaces simultaneously, please repeat the following steps for all domains under your control.
Step 3. Replace the service account key file
- Rename the newly-generated service account key file as jwt.json.
Replace the service account key file <installation directory>/db/jwt.json on the CubeBackup server with the newly-created one.
By default, the installation directory is C:\Program Files\CubeBackup4 on Windows, and /opt/cubebackup on Linux.
For Linux and Docker users, please change the ownership of this new service account key file to cbuser.
sudo chown cbuser:cbuser /opt/cubebackup/db/jwt.json
Step 4. Restart the CubeBackup service
Restart the CubeBackup service using the following command.
Please run this command.
sudo /opt/cubebackup/bin/cbsrv restartOpen a Command Prompt as Administrator, and run this command.
"C:\Program Files\CubeBackup4\bin\cbsrv.exe" restartOpen the Windows PowerShell as Administrator, and run this command.
& "C:\Program Files\CubeBackup4\bin\cbsrv.exe" restartPlease run this command to restart the container.
sudo docker restart <container-name>Step 5. Confirm that everything is operating correctly
CubeBackup should now work with the new service account. You should perform a test restore and backup to confirm that everything is operating correctly.
If you need additional assistance, please do not hesitate to contact [email protected].
Step 6. Encrypt the new service account key file
For privacy and security reasons, CubeBackup for Google Workspace automatically encrypts your service account key file during the initial setup. This ensures that potentially sensitive information is protected and no cannot be accessed by intruders or anyone with physical access to your backup server.
After completing this manual update using the plaintext service account key file, you can follow the instructions at How to encrypt the service account and configuration files of my CubeBackup instance to encrypt it on the backup server.