Installation of CubeBackup for Microsoft 365
CubeBackup for Microsoft 365 can run on Windows and Linux OS.
For Linux Users:
Headless installation via command line:
curl -s https://www.cubebackup.com/install.sh?productId=2 | sudo bashSupported Linux distributions
- CentOS(RHEL) 7 (x86_64) and above
- Ubuntu 20 (x86_64) and above
- Debian 9 (x86_64) and above
- openSUSE 13 (x86_64) and above
After successfully installing CubeBackup on your Linux server, open the web browser to begin the Initial configuration of CubeBackup for Microsoft 365 on Linux.
For Windows Users:
Download CubeBackup Windows installer and run it on the Windows server.
Supported Windows Versions
- Windows Server 2016 64-bit and above
- Windows 10 64-bit and above
After successfully installing CubeBackup on your server, the configuration wizard will automatically open in your default browser. Begin the Initial Configuration of CubeBackup for Microsoft 365 on Windows.
For Docker Users:
The CubeBackup official docker image is available on Docker Hub under the image name: cubebackup/cube365 .
- The docker image is based on Debian 11 and can run on Linux or Mac hosts. Docker for Windows is not officially supported.
- The CubeBackup Dockerfile is available here
Data persistency
Although it is possible to start a docker container using a simple command like:
sudo docker run -d -p 80:80 --name cubebackup cubebackup/cube365Since the integrity of backups are so essential, we strongly recommend that you control the data persistency of your docker instance. If you look into the Dockerfile , you will find that there are 2 volumes defined:
"/cubebackup_data" is the location of the backup data. You should bind mount the backup target directory on the host into the container at /cubebackup_data when starting the docker container.
If you are backing up to cloud storage, such as Amazon S3 or Azure Blob storage, this volume should be ignored.
"/cubebackup_index" is the location of the data index. The access speed of the data index is crucially important for the performance of the backup, so it is strongly recommended to bind mount a directory on a local SSD on the host to the /cubebackup_index volume. If you have no idea what the data index is yet, please visit this doc .
Note: You must bind mount into this volume using direct local storage (not mounted network storage!), otherwise there will be serious performance issues. A fast local SSD is recommended as the best option.
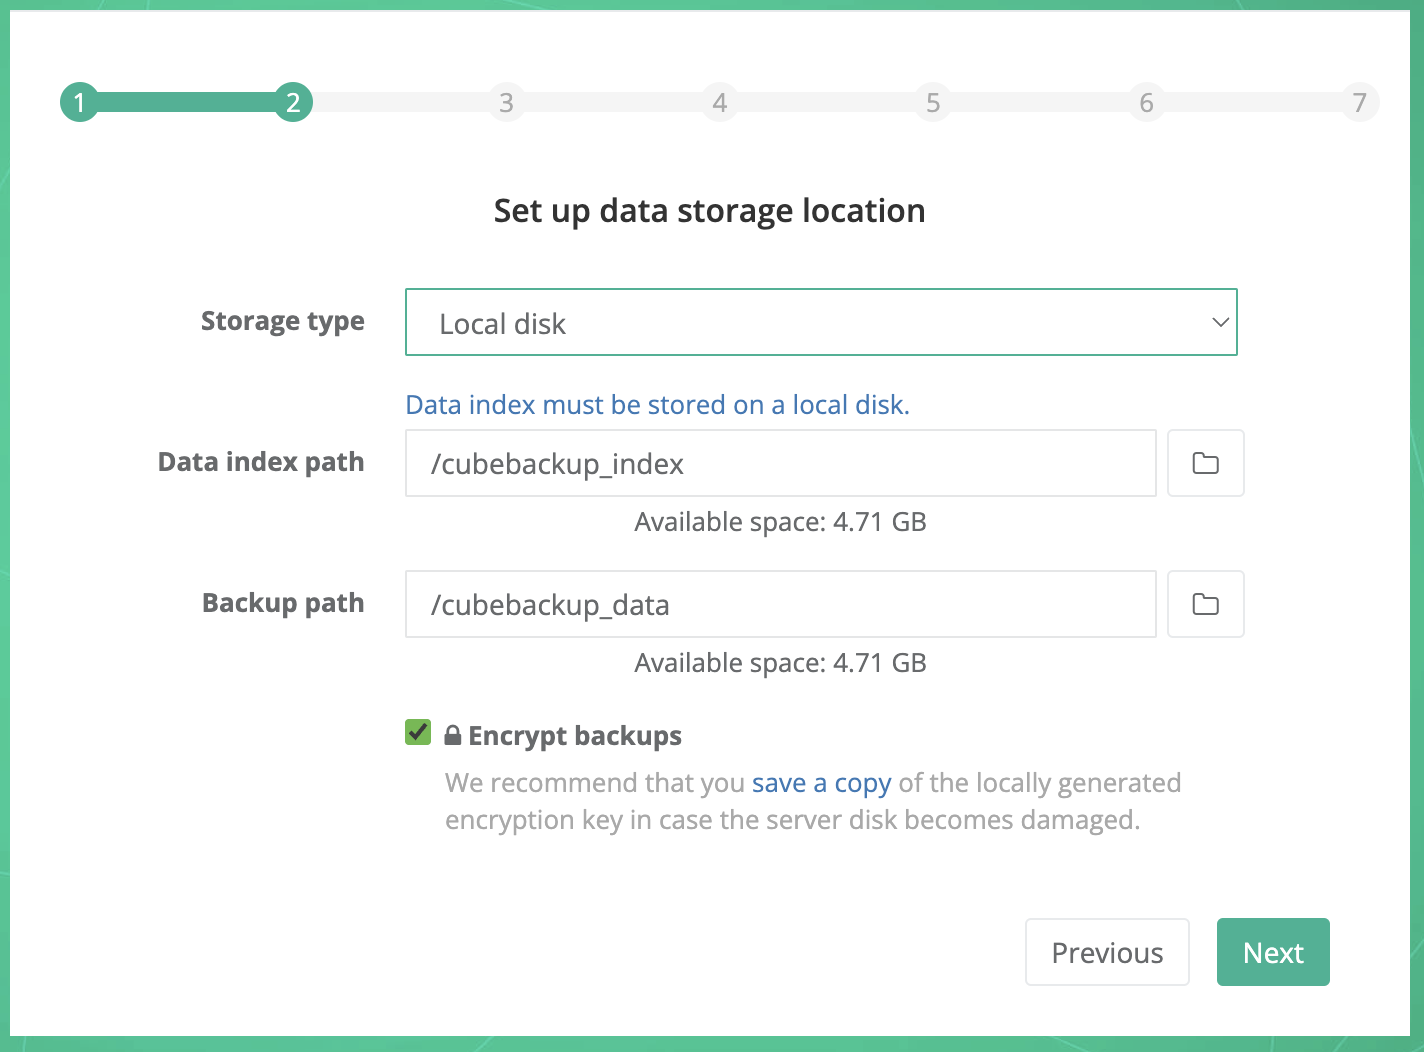
When later setting the backup location during the initial configuration of CubeBackup, please be sure to select /cubebackup_data as the Backup path (or the Network storage path), and select /cubebackup_index as the Data index path.
In addition to the backup data, you may also want to keep the configurations and logs of CubeBackup persistent on the host machine, which can give you more flexibility when upgrading, stopping, or recreating docker containers.
To decouple the configurations and logs of CubeBackup from its runtime container, three directories in the docker container need to be exposed:
"/opt/cubebackup365/etc" directory is the location to store the main configuration file (config.toml) for the CubeBackup app. We recommend using a named volume, like cube365_cfg, so that the CubeBackup configuration file will persist when starting a new docker container.
"/opt/cubebackup365/data" directory is the location to store the other application settings, key files, and an SQLite database for sessions. Again, we recommend using a named volume, like cube365_data, so that these settings and files will persist when starting a new docker container.
"/opt/cubebackup365/log" directory stores log files for CubeBackup. We recommend using a named volume, like cube365_log, so that the log files persist when starting a new docker container.
An example to start a CubeBackup container
Docker run command example:
sudo docker run -d -p 80:80 -p 443:443 \
  -v /var/cubebackup_index:/cubebackup_index \
  -v /var/cubebackup_data:/cubebackup_data \
  --mount source=cube365_cfg,target=/opt/cubebackup365/etc \
  --mount source=cube365_data,target=/opt/cubebackup365/data \
  --mount source=cube365_log,target=/opt/cubebackup365/log \
  --name cubebackup \
  cubebackup/cube365
An example of the docker-compose.yml file:
version: "3.8"
services:
  cubebackup:
    image: cubebackup/cube365
    restart: always
    ports:
      - "80:80"
      - "443:443"
    volumes:
      - /var/cubebackup_index:/cubebackup_index
      - /var/cubebackup_data:/cubebackup_data
      - cube365_cfg:/opt/cubebackup365/etc
      - cube365_data:/opt/cubebackup365/data
      - cube365_log:/opt/cubebackup365/log
volumes:
  cube365_cfg:
  cube365_data:
  cube365_log:
Detailed instructions
If you plan to run CubeBackup in a docker container, we strongly recommend that you bind mount host directories into the container to store the backup data and the data index. This allows data persistence and better disk performance, and is actually the recommended mechanism for persistent data generated by and used by Docker containers.
Backup storage space: Please ensure the backup location has enough available space to store all employee data in your Microsoft 365 organization, including any future backups. A good rule of thumb is to reserve 2x the estimated data size for your domain. For example, if there are 100 users in your Microsoft 365 organization and each user has 10GB of data on average, there should be at least 100*10GB*2 = 2TB of space available for the backup.
Data index: The data index contains metadata and cache files for your backups, so its access speed is crucially important for backup performance. For performance reasons, CubeBackup requires you to keep the data index on a local drive, preferably a fast drive like an SSD. See What is the data index? for more information.
CubeBackup allows you to backup all data in your Microsoft 365 organization to a local disk, network storage, or cloud storage, such as Amazon S3, Google Cloud Storage, Azure Blob Storage, etc. Depending on your backup target, the commands to create a docker container are slightly different.
Backup to a local disk
sudo docker run -d -p 80:80 -p 443:443 \
  -v /var/cubebackup_index:/cubebackup_index \
  -v /var/cubebackup_data:/cubebackup_data \
  --mount source=cube365_cfg,target=/opt/cubebackup365/etc \
  --mount source=cube365_data,target=/opt/cubebackup365/data \
  --mount source=cube365_log,target=/opt/cubebackup365/log \
  --name cubebackup \
  cubebackup/cube365
Docker Compose facilitates the management of containers using a docker-compose.yml file. Here is an example of the docker-compose.yml file for CubeBackup:
version: "3.8"
services:
  cubebackup:
    image: cubebackup/cube365
    restart: always
    ports:
      - "80:80"
      - "443:443"
    volumes:
      - /var/cubebackup_index:/cubebackup_index
      - /var/cubebackup_data:/cubebackup_data
      - cube365_cfg:/opt/cubebackup365/etc
      - cube365_data:/opt/cubebackup365/data
      - cube365_log:/opt/cubebackup365/log
volumes:
  cube365_cfg:
  cube365_data:
  cube365_log:
This will create a docker container from the cubebackup/cube365 image, binding /var/cubebackup_index on the host to /cubebackup_index in the container for the data index, and /var/cubebackup_data on the host machine to /cubebackup_data in the container for the backup data. The configurations and logs of CubeBackup are stored in named volumes cube365_cfg, cube365_data, and cube365_log.
After starting the docker container, the CubeBackup web console is accessible through http://<host-IP>.
Tips:
1. We recommend exposing port 443 when creating the docker container, so that later you can enable HTTPS/SSL for the CubeBackup web console if needed.
2. If port 80 on the host computer is in use by another service, please choose a different binding port (such as 8088).
Backup to network storage
In order to backup Microsoft 365 data to network storage, such as a NAS or SAN, be sure to first mount the network storage onto your host machine (e.g. /mnt/nas). This host path will then be bind mounted to a path inside the docker container as a volume.
sudo docker run -d -p 80:80 -p 443:443 \
  -v /var/cubebackup_index:/cubebackup_index \
  -v /mnt/nas_path/cubebackup_data:/cubebackup_data \
  --mount source=cube365_cfg,target=/opt/cubebackup365/etc \
  --mount source=cube365_data,target=/opt/cubebackup365/data \
  --mount source=cube365_log,target=/opt/cubebackup365/log \
  --name cubebackup \
  cubebackup/cube365
Docker Compose eases the management of containers using a docker-compose.yml file. Here is an example of the docker-compose.yml file:
version: "3.8"
services:
  cubebackup:
    image: cubebackup/cube365
    restart: always
    ports:
      - "80:80"
      - "443:443"
    volumes:
      - /var/cubebackup_index:/cubebackup_index
      - /mnt/nas_path/cubebackup_data:/cubebackup_data
      - cube365_cfg:/opt/cubebackup365/etc
      - cube365_data:/opt/cubebackup365/data
      - cube365_log:/opt/cubebackup365/log
volumes:
  cube365_cfg:
  cube365_data:
  cube365_log:
This will create a docker container from the cubebackup/cube365 image, binding /var/cubebackup_index on the host to /cubebackup_index in the container for the data index, and /mnt/nas_path/cubebackup_data on the host machine to /cubebackup_data in the container for the backup data. The configurations and logs of CubeBackup are stored in the named volumes cube365_cfg, cube365_data, and cube365_log.
After starting the docker container, the CubeBackup web console is accessible through http://<host-IP>.
Tips:
1. We recommend exposing port 443 when creating the docker container, so that later you can enable HTTPS/SSL for the CubeBackup web console if needed.
2. If port 80 on the host computer is in use by another service, please choose a different binding port (such as 8088).
Backup to cloud storage
CubeBackup allows you to backup Microsoft 365 data to cloud storage, such as Amazon AWS S3, Google Cloud Storage, Azure Blob Storage, or even AWS S3 compatible storage.
sudo docker run -d -p 80:80 -p 443:443 \
  -v /var/cubebackup_index:/cubebackup_index \
  --mount source=cube365_cfg,target=/opt/cubebackup365/etc \
  --mount source=cube365_data,target=/opt/cubebackup365/data \
  --mount source=cube365_log,target=/opt/cubebackup365/log \
  --name cubebackup \
  cubebackup/cube365
Docker Compose eases the management of containers using a docker-compose.yml file. Here is an example of the docker-compose.yml file:
version: "3.8"
services:
  cubebackup:
    image: cubebackup/cube365
    restart: always
    ports:
      - "80:80"
      - "443:443"
    volumes:
      - /var/cubebackup_index:/cubebackup_index
      - cube365_cfg:/opt/cubebackup365/etc
      - cube365_data:/opt/cubebackup365/data
      - cube365_log:/opt/cubebackup365/log
volumes:
  cube365_cfg:
  cube365_data:
  cube365_log:
This will create a docker container from the cubebackup/cube365 image, binding /var/cubebackup_index on the host to /cubebackup_index in the container for the data index. The configurations and logs of CubeBackup are stored in named volumes cube365_cfg, cube365_data, and cube365_log.
After starting the docker container, the CubeBackup web console is accessible through http://<host-IP>.
Tips:
1. We recommend exposing port 443 when creating the docker container, so that later you can enable HTTPS/SSL for the CubeBackup web console if needed.
2. If port 80 on the host computer is in use by another service, please choose a different binding port (such as 8088).