Operation Guide for CubeBackup for Google Workspace
Backup overview
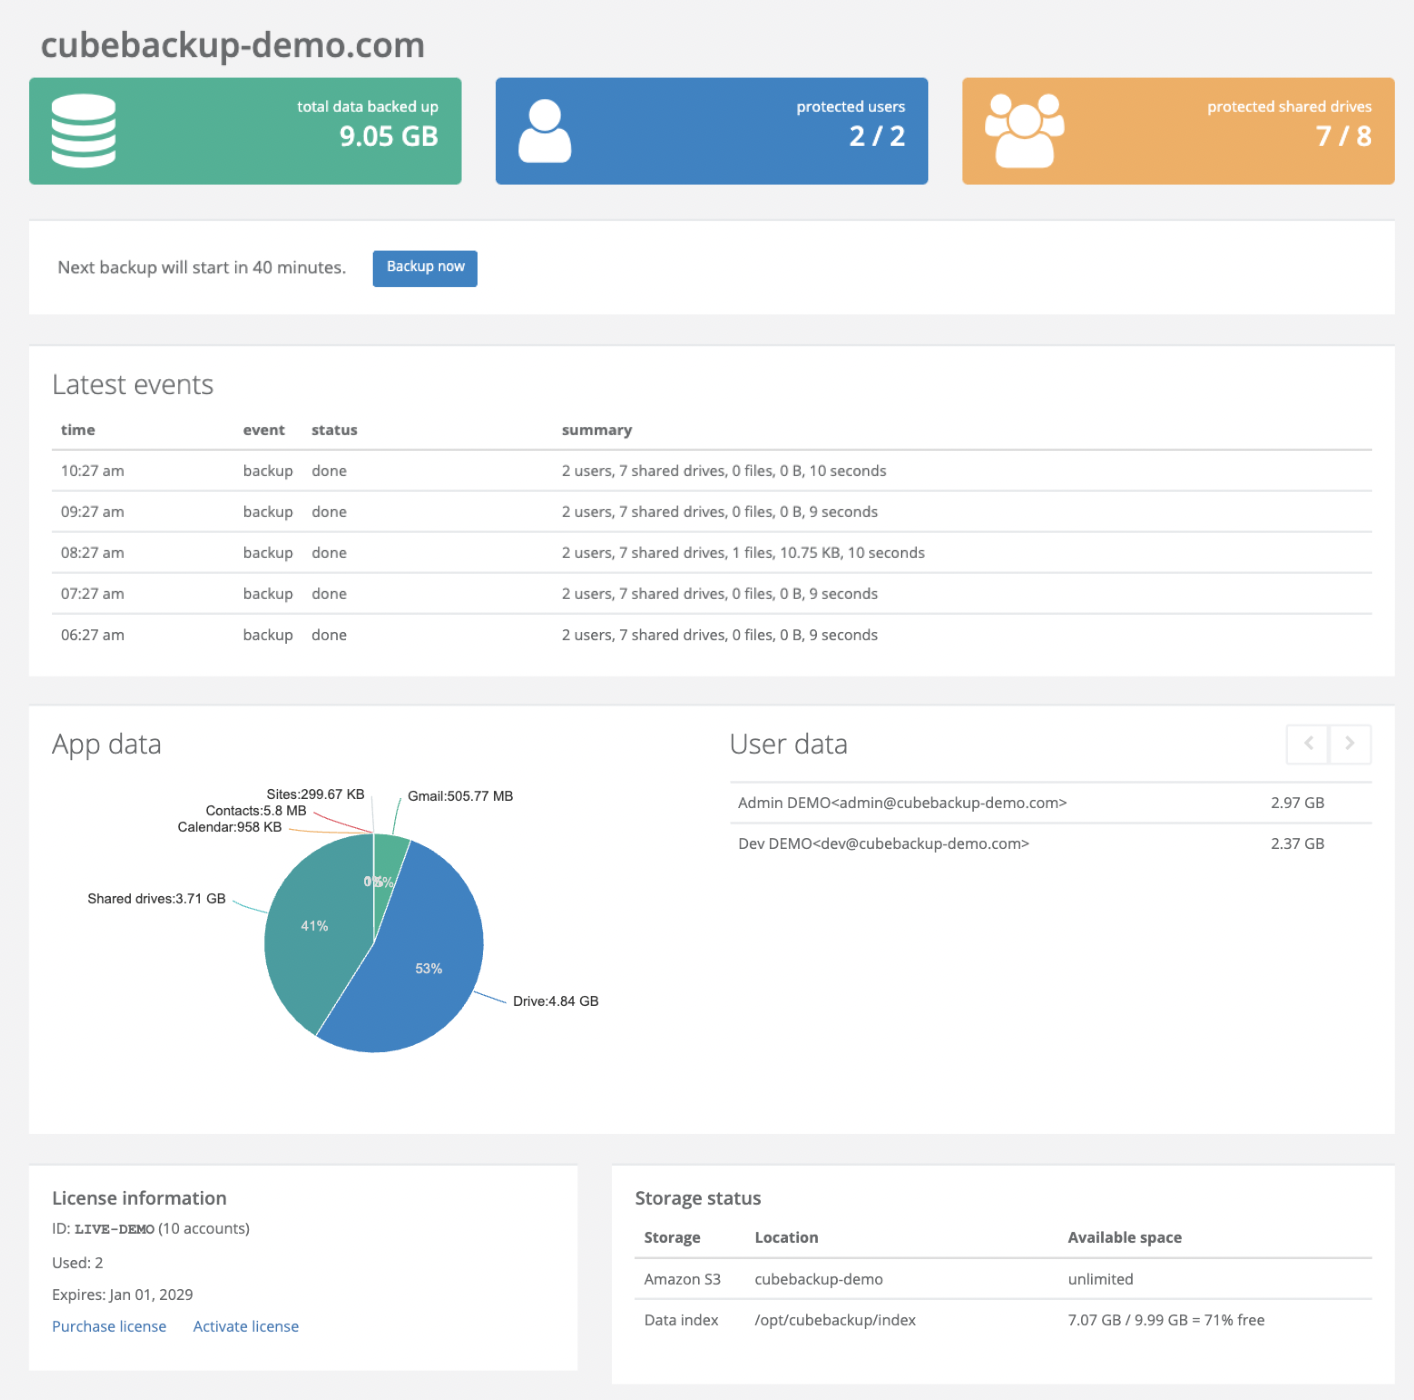
Central to the CubeBackup web console is the overview page, which provides administrators with all essential information at a glance for the active domain. Here you can find the total data in the backup, number of protected users and Shared drives, latest events, a graphical breakdown of app and user data, as well as license information and storage space status.
Restore
For the protection and security of your data, CubeBackup will NEVER overwrite current working versions. All restored data, whether Google Drive files or folders, Gmail messages, contacts, calendar events, or Sites files, will be placed in a specially created folder named Restored <date-time> by default, and will NOT overwrite the current working data. This means you can safely restore any data to any version at any time without worry.
CubeBackup is designed to keep a version history of all of your data, including entire folder structures, making it easy to restore to an earlier point in time. For example, you can turn back the clock on an entire project, restoring all files and folders to the exact state they were in two months ago.
Restore Google Drive files or folders
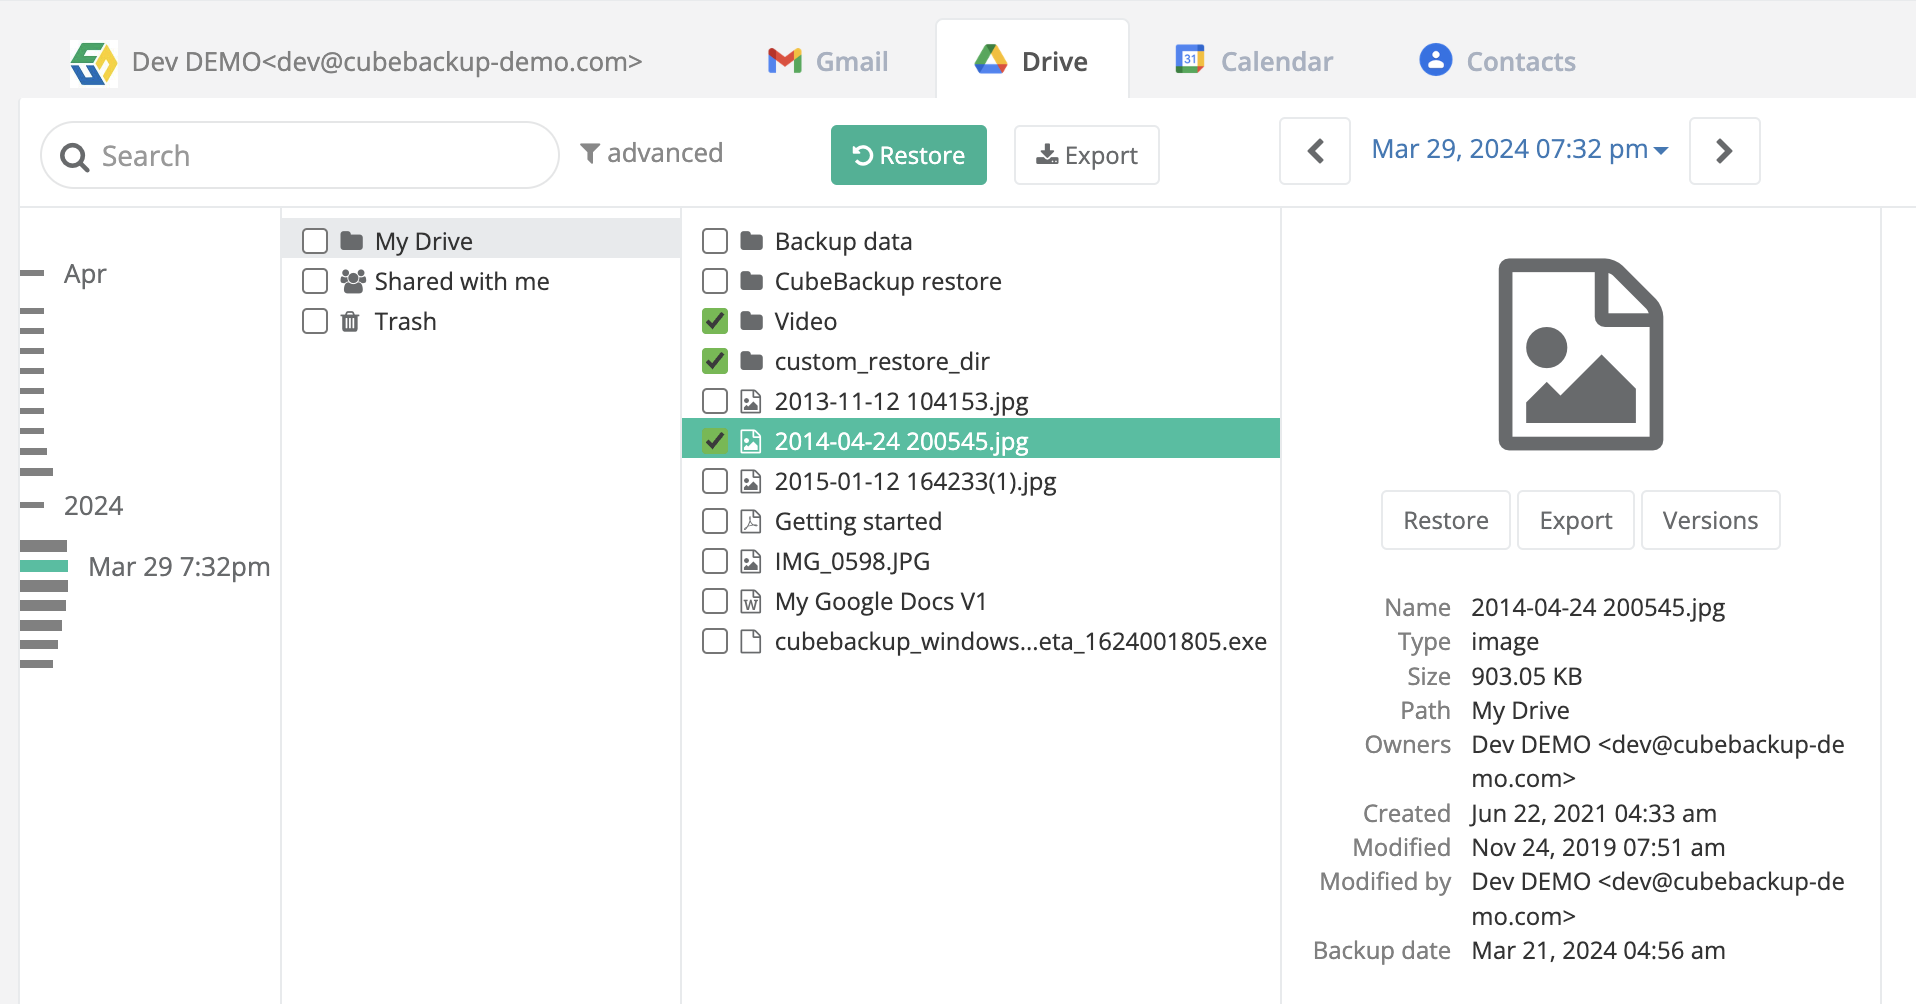
- Select Users from the left panel.
- Select the user whose data needs to be restored, using the search box or advanced search link if necessary.
- Click the Drive tab on the user restore page.
- To restore a single file:
- Find the file by browsing through the Drive structure, or use the search box or advanced search link.
- Click on the file to display detailed information, including filename, size, and backup date.
- Click the Versions button to list all available revisions of the file.
- Select the version to restore and click Restore.
- Select the account you'd like to restore the file to and click Restore.
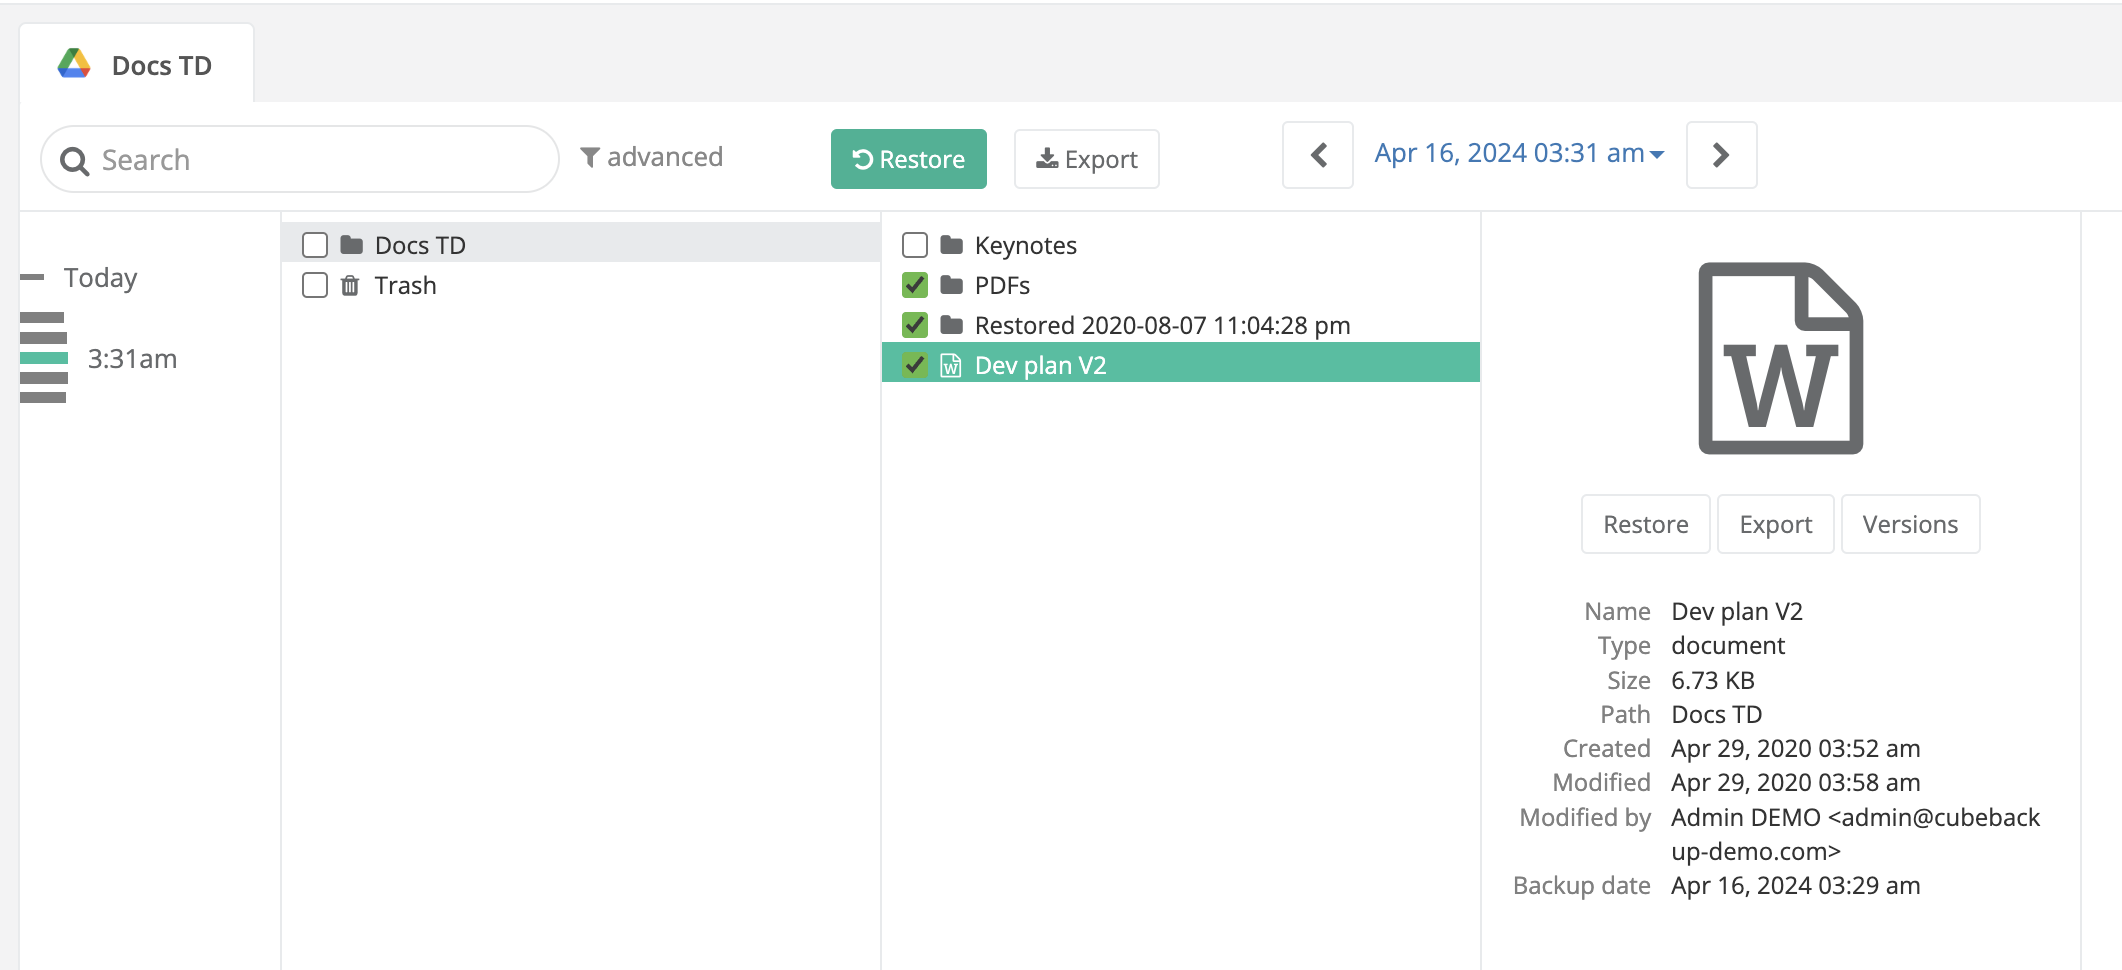
- To restore multiple files or folder:
- The timeline in the left panel shows the available snapshots, each representing the state of your entire Google Drive at that moment in time. Use the timeline to select the point in the version history you would like to return to.
- Select the files and folders you would like to restore, using the search box or advanced search link if necessary.
- Click Restore.
- Select the account you'd like to restore the files and folders to and click Restore.
- By default, restored Google Drive files and folders will be placed in a folder named Restored <date-time>. You can also choose a specific target folder instead.
Restore Shared drives files or folders
- Select the Shared drives from the left panel.
- Select the Shared drive whose data needs to be restored, using the search box or advanced search link if necessary.
- To restore a single file:
- Find the file by browsing through the Shared drive structure, or use the search box or advanced search link.
- Click on the file to display detailed information, including filename, size, and backup date.
- Click the Versions button to list all available revisions of the file.
- Select the version to restore and click Restore.
- Select the Shared drive you'd like to restore the file to and click Restore.
- To restore multiple files or folders:
- The timeline in the left panel shows the available snapshots, each representing the state of your entire Shared drive at that moment in time. Use the timeline to select the point in the version history you would like to return to.
- Select the files and folders you would like to restore, using the search box or advanced search link if necessary.
- Click Restore.
- Select the Shared drive you'd like to restore the files and folders to and click Restore.
- By default, restored Shared drive files and folders will be placed in a folder named Restored <date-time>. You can also choose a specific target folder instead.
Restore Gmail messages
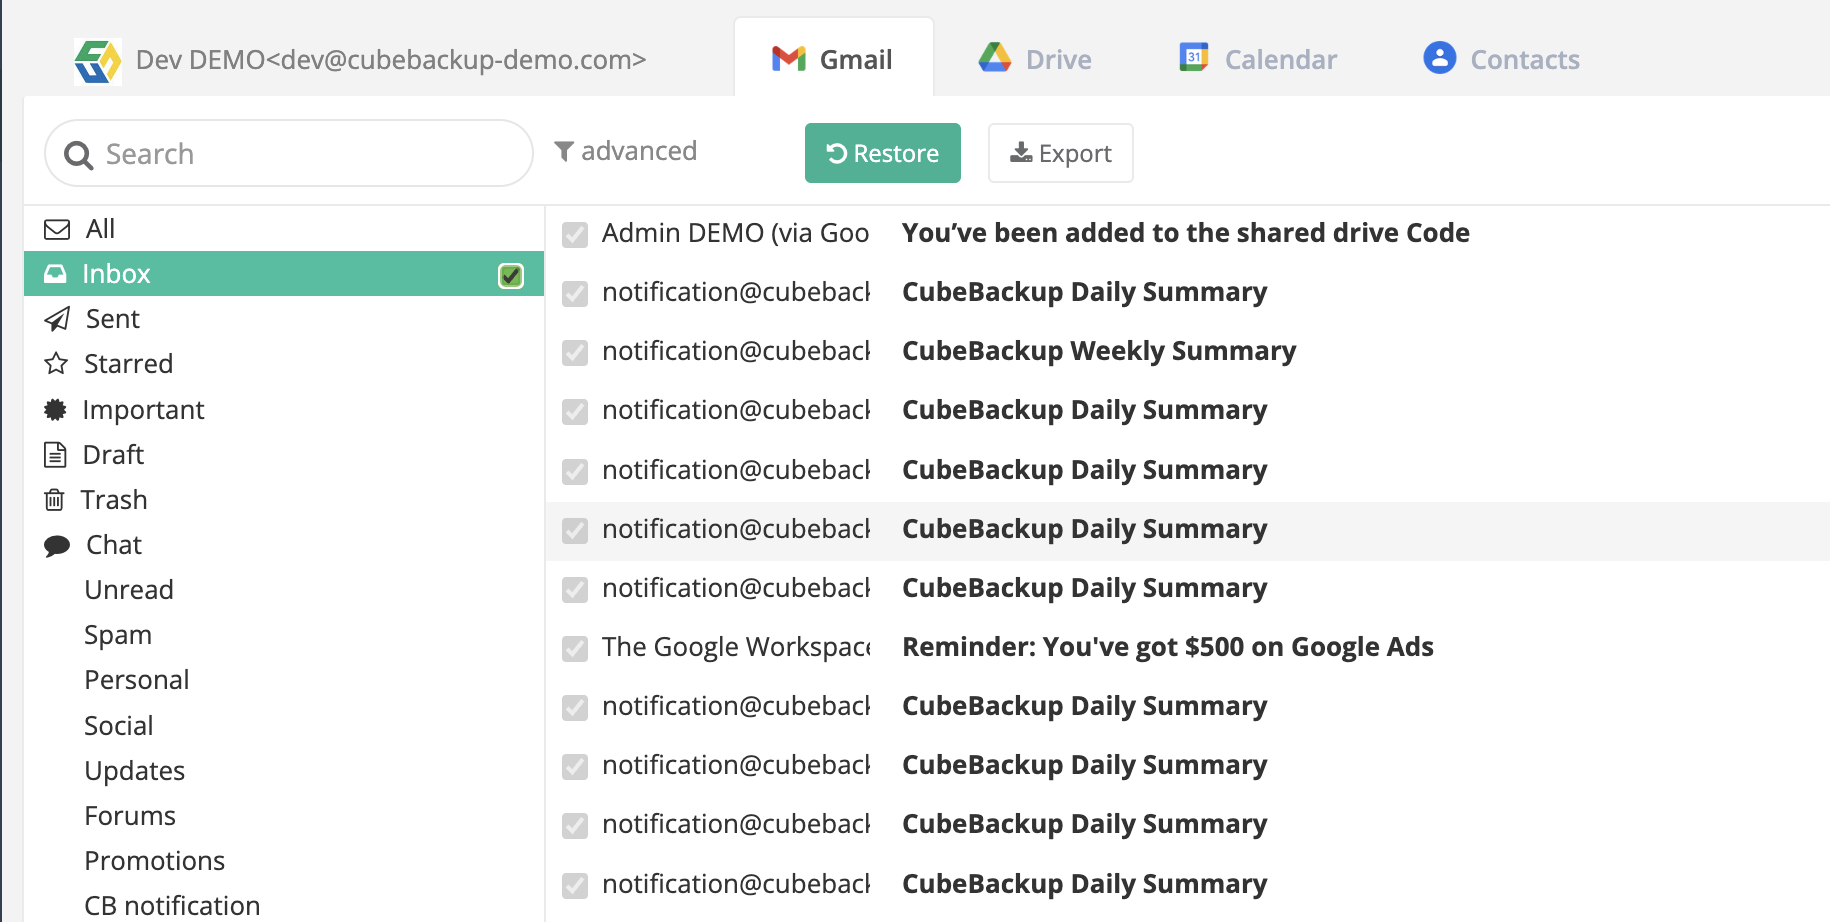
- Select Users from the left panel.
- Select the user whose data needs to be restored, using the search box or advanced search link if necessary.
- Click the Gmail tab on the user restore page.
- To restore mail messages:
- Select the messages you want to restore. You can filter messages using the search box or advanced search link or the date controls at the top of the page, or also by Gmail labels.
- Click Restore.
- Select the account you'd like to restore the messages to and click Restore.
- To transfer all messages to another account:
- Select the checkbox beside All in the mail labels section.
- You may also want to check Spam and Trash folders if you would like to transfer junk or deleted messages. These are not included under All.
- Click the Restore button
- Select the account you'd like to restore the messages to and click Restore.
Messages restored to a user's Gmail account will have all original labels and timestamps preserved. By default, CubeBackup will also add a label that lists the date and time of restoration (i.e.: Restored 2021-08-11 10:15:02 am), or you can specify a target label instead.
For example, if a message was originally labelled "INBOX" and "Team" when it was backed up, when restored, it now have three labels: "INBOX", "Team", and either "Restored 2021-08-11 10:15:02 am" or a custom label of your choosing.
Restore Google Contacts
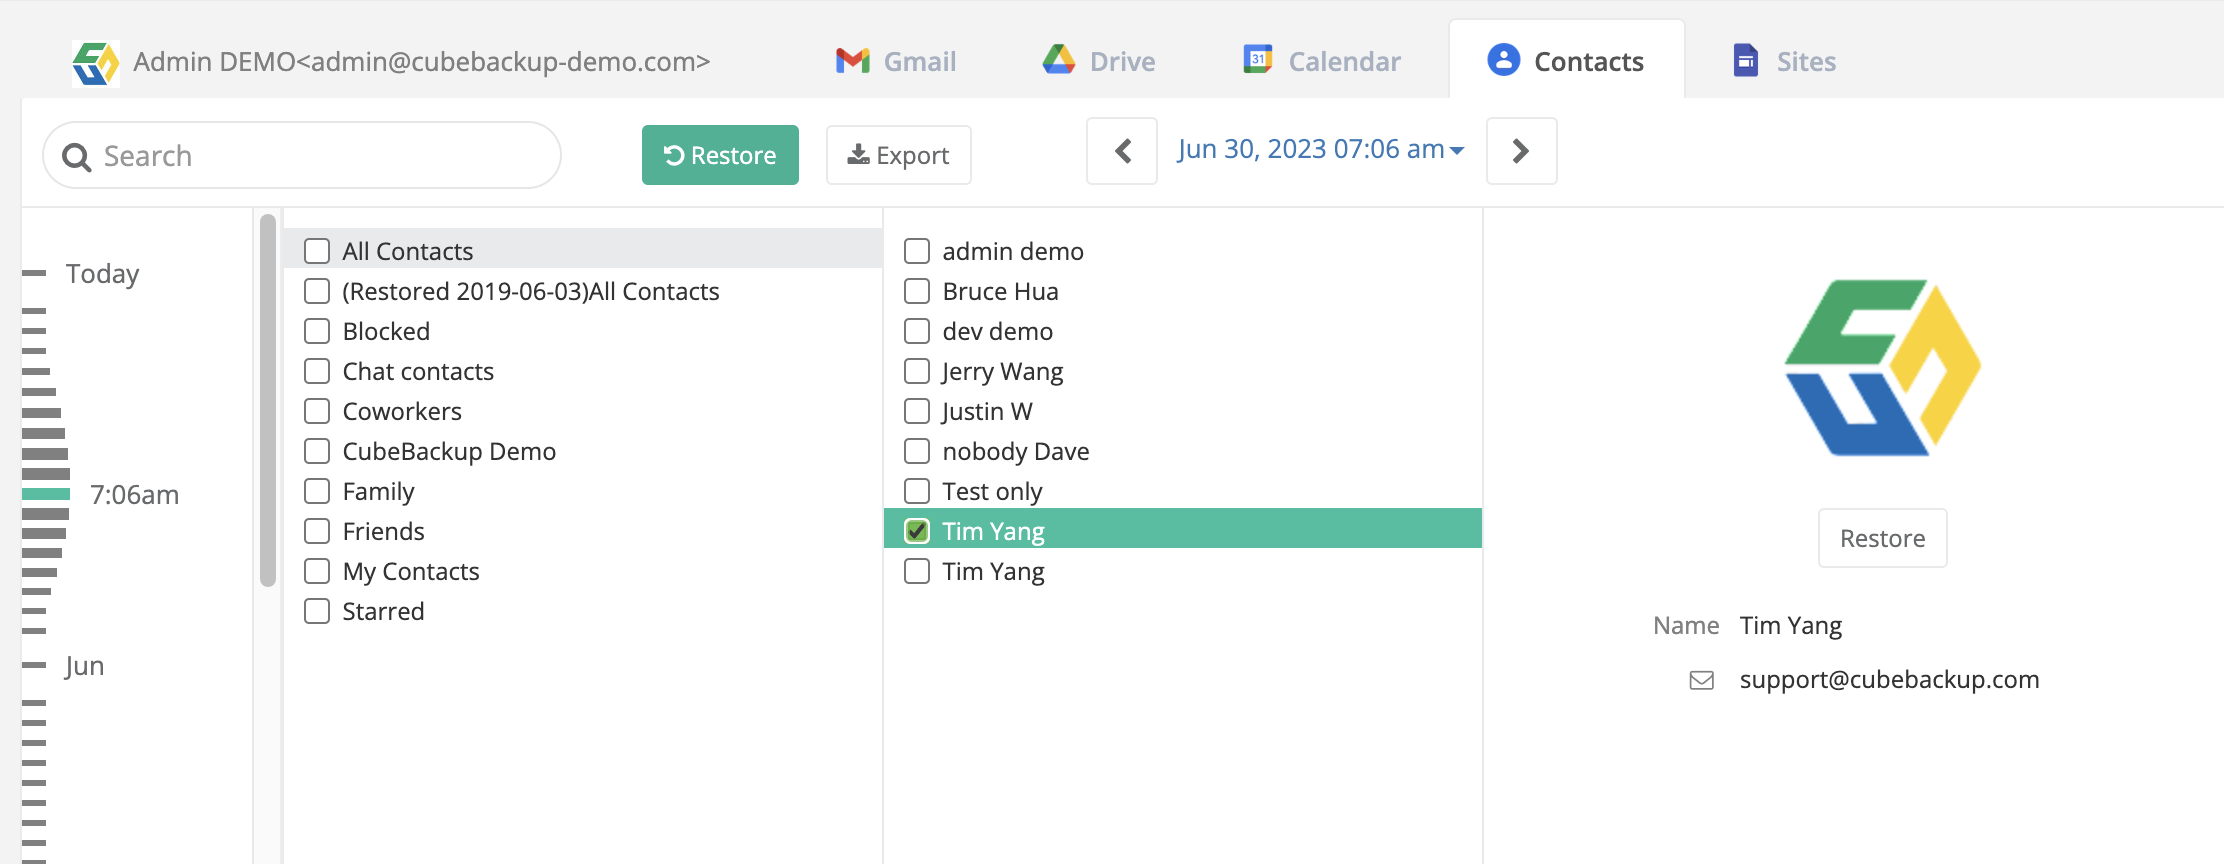
- Select Users from the left panel.
- Select the user whose data needs to be restored, using the search box if necessary.
- Click the Contacts tab on the user restore page.
- The timeline in the left panel shows the available snapshots, each representing the state of your entire Google Contacts at that moment in time. Use the timeline to select the point in the version history you would like to return to.
- Select the contacts or groups you would like to restore, using the search box if necessary.
- Click Restore.
- Select the account you'd like to restore the contacts to and click Restore.
- A new group is created in that user's Google Contacts, containing the restored contacts. The group will be named (Restored <date><group_name>). These contacts can then be manually moved.
Restore Google Calendar events
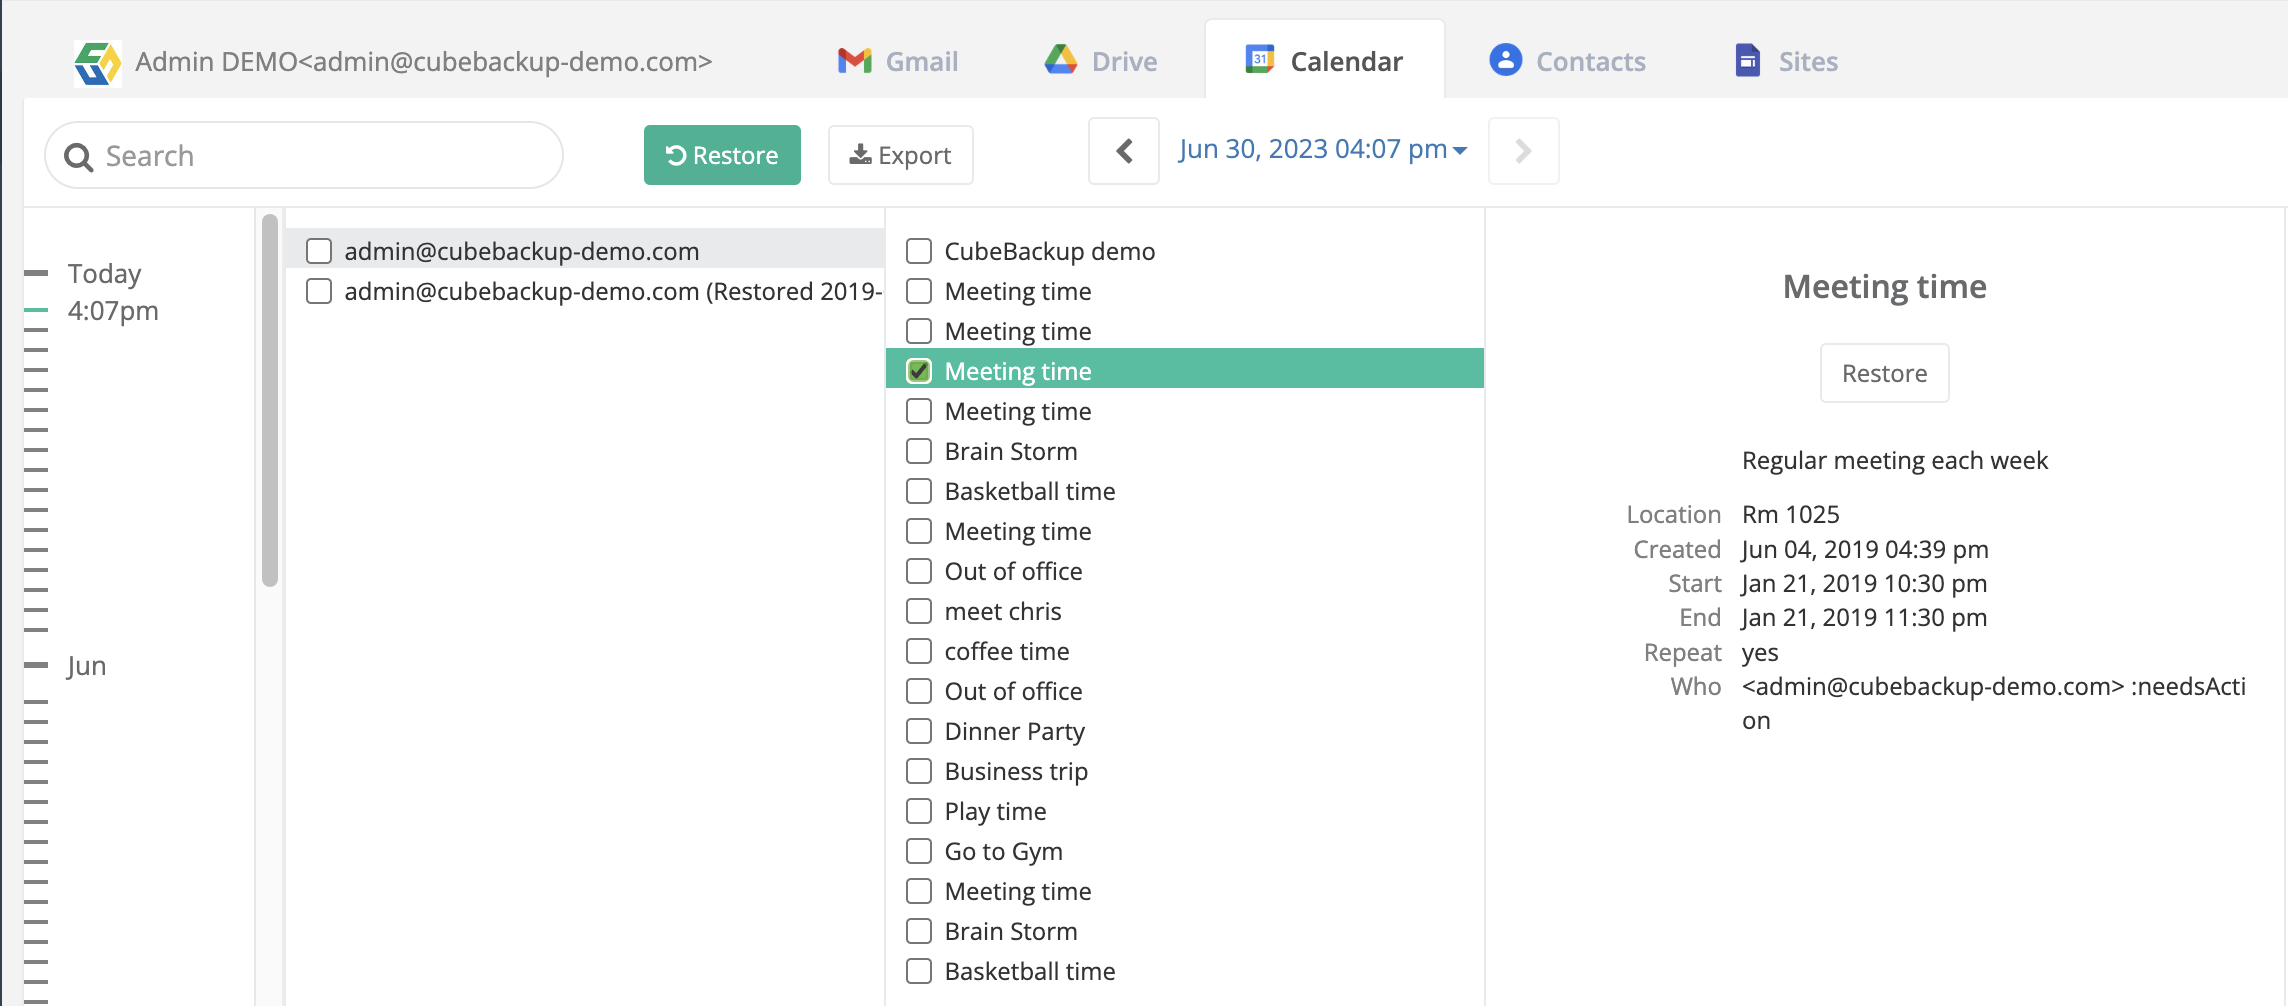
- Select Users from the left panel.
- Select the user whose data needs to be restored, using the search box if necessary.
- Click the Calendar tab on the user restore page.
- The timeline in the left panel shows the available snapshots, each representing the state of all Google Calendars belonging to that user (and all Calendars shared with that user) at that moment in time. Use the timeline to select the point in the version history you would like to return to.
- Select the events or calendars you would like to restore, using the search box to find events, if necessary.
- Click Restore.
- Select the account you'd like to restore the events or calendars to and click Restore.
- In the user's Google Calendar, a new calendar is created for that user, containing the restored events. The calendar will be named <user> (Restored <date-time>).
NOTE: CubeBackup only backs up your own calendars. System calendar (e.g. Birthdays, Holidays) and calendars shared from others are not included in the backups.
View history
The HISTORY page displays the Backup, Restore and Export logs so you can easily monitor recent activities. Each time an action is performed, CubeBackup will add a log entry to this page. Separate tabs track entries for Backup, Restore, and Export actions.
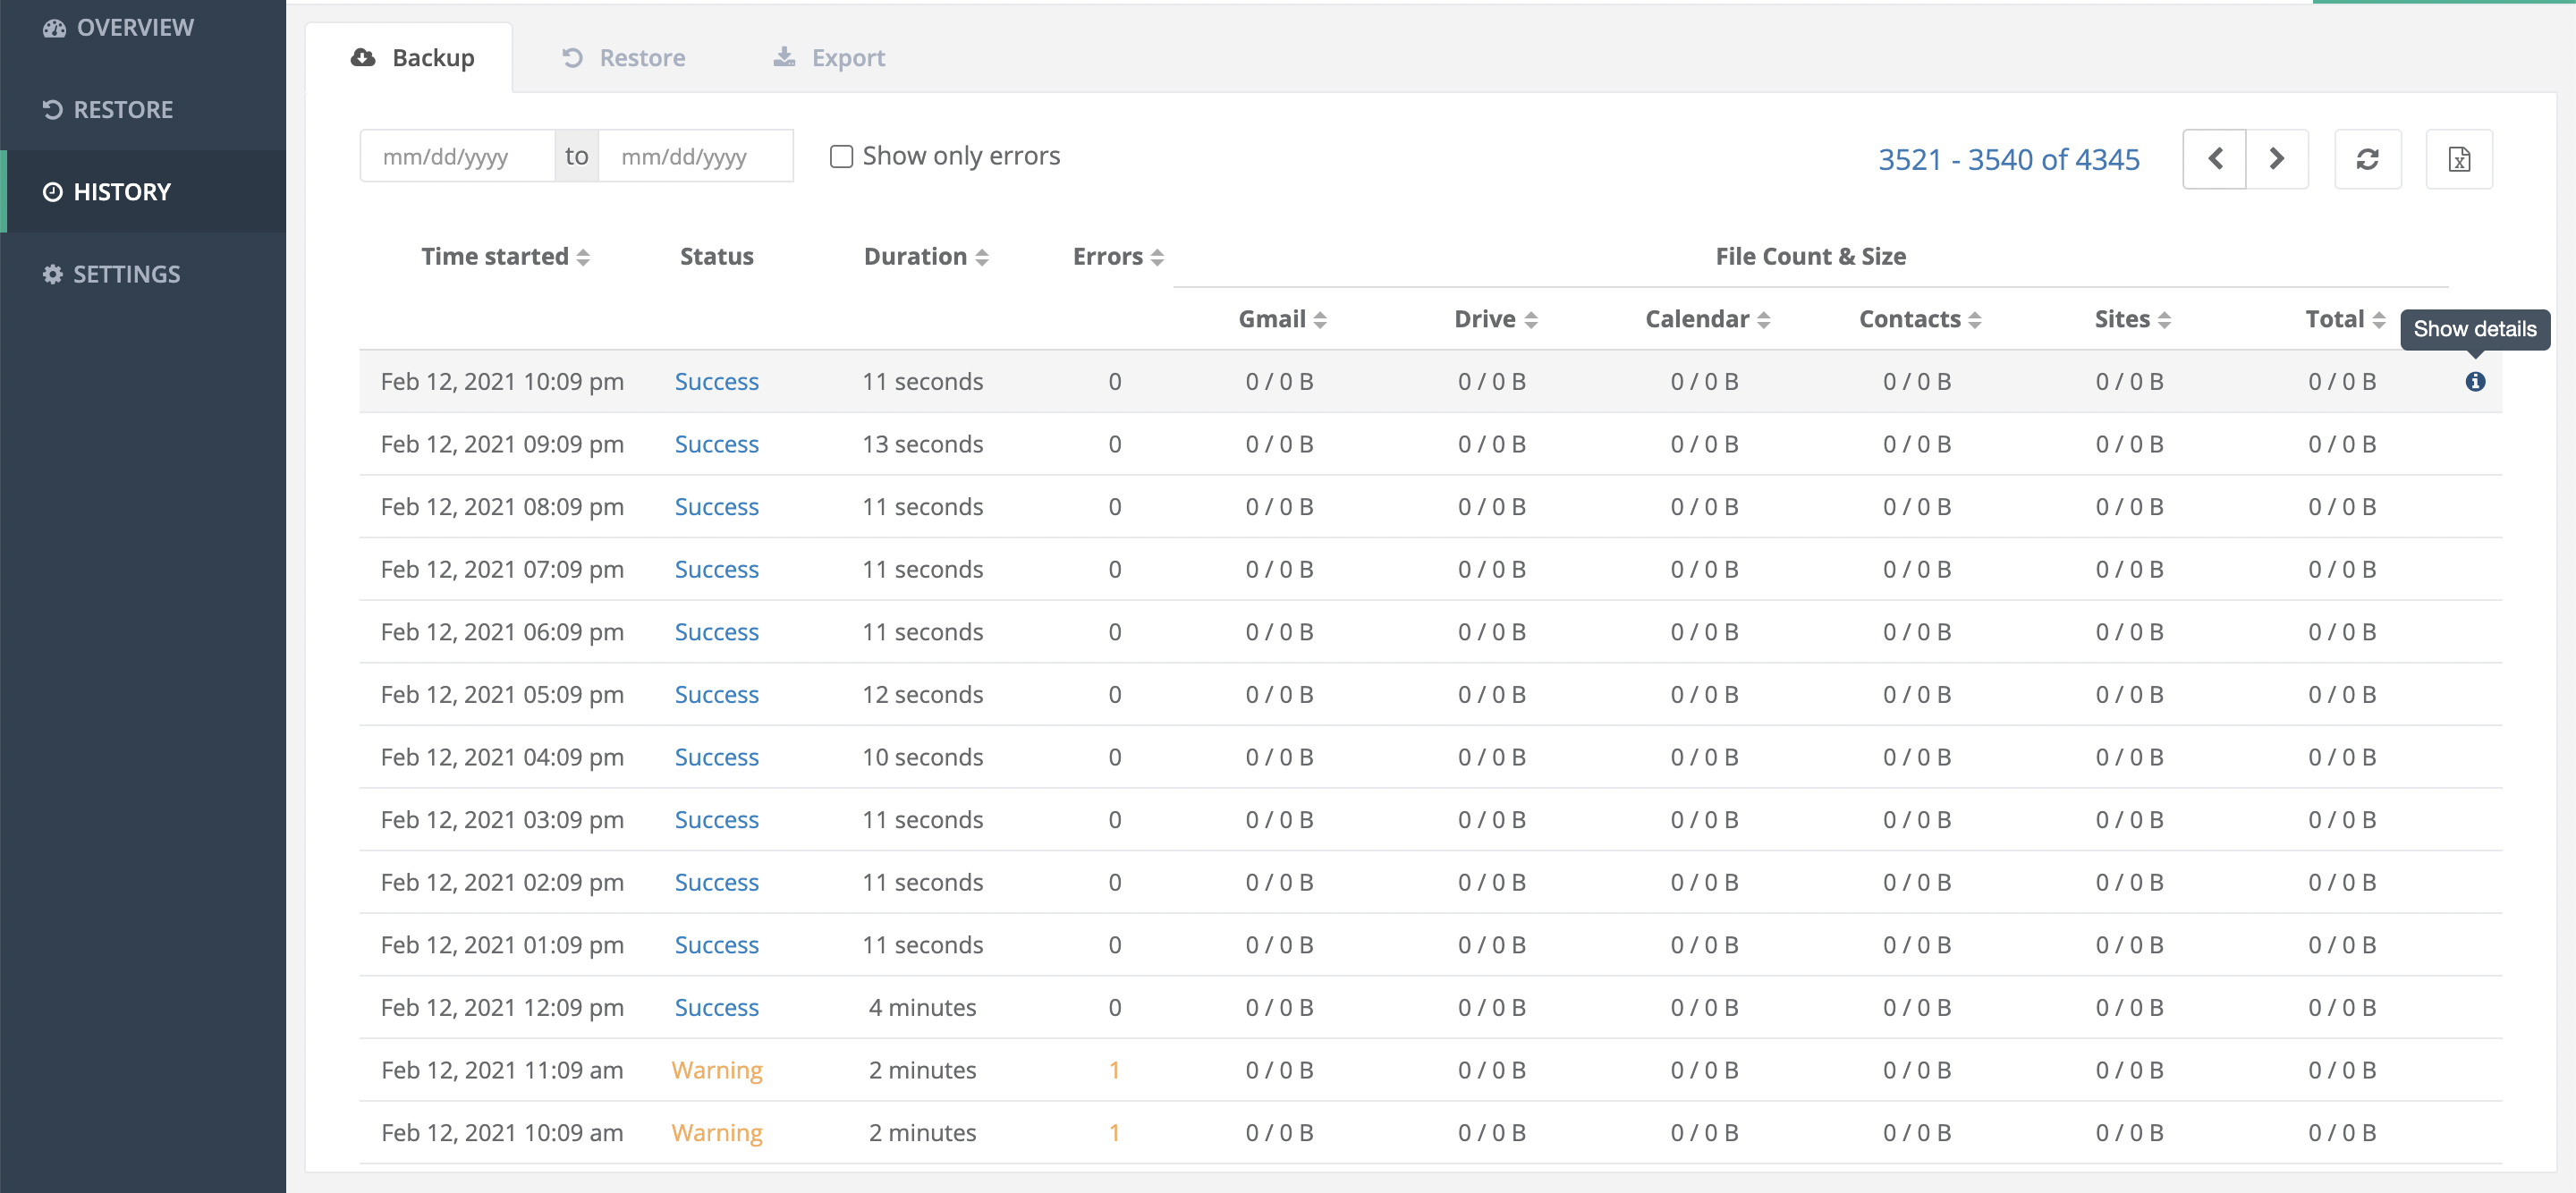
On the Backup tab, clicking on individual backup entries will take you to another page listing information for all users and Shared drives that were part of that particular backup. You can filter this list or export it to a CSV file.
On the Restore and Export tabs, clicking the links under the Files column will open a pop-up window showing the individual items that were Restored or Exported for that entry. You can also filter this list or export it to a CSV file.
The controls at the top of each tab can be used to filter the lists by description, date, or for a particular backup, by user/shared drive. A button in the top-right corner will export the displayed list to a CSV file.
Actions that have given an error will be highlighted in Warning in the list. The list can also be set to only display errors by clicking the Show only errors box. Clicking the Warning or Failed entry under Status or Errors will open a pop-up box detailing the error messages for that action. If you need assistance, these detailed messages can be copied or exported to a CSV file and sent to [email protected] for help.